
“Have your people call my people.”
Familiar with that line? It’s been in countless films, largely as a joke about pretending to be wealthy–with all the personnel that entails — and has since found its way onto hundreds of dog collars.
It’s also the easiest way to describe an Application Programming Interface (API). Instead of direct communication, the API passes your request onto the party in question. As you likely know, APIs enable two systems to communicate — for instance, the web client and the backend of an application.
There are many types of APIs as well as varied protocols, one of which is known as Representational State Transfer or REST. Now one of the most popular protocols, REST was created back in 2000 by a group of people led by computer scientist Roy Fielding. Their task? Bringing metaphorical law and order to what was then the Wild West of APIs; there were no agreed-upon rules for how servers would communicate with each other. But that’s all in the past. What you need to know in today's world is that the main principles of REST are statelessness, a uniform interface, and cacheability.
As you may have guessed, we’re going to focus on caching.
Caching stores and retrieves data from a software or hardware component. When a client (such as a browser) makes a REST API request, it can save the API response in a cache. The next time the client initiates that request, it gets a faster response because the server doesn’t have to process it all over again.
Caching is vital for every API. It saves on overhead and improves response times. But that’s just the start. There’s so much more to caching in REST APIs – all of which you’ll soon put into action.
Why Use Caching?
Caching REST APIs offers so many benefits:
It improves response times: When a client repeatedly initiates an API without caching instructions, the API’s response time is the same whether or not the data changes or not. An API with caching instructions speeds up response time because the client’s first request is saved in the cache for future requests. As long as the data hasn’t expired or changed, the API results can be used again and again. Hey, hey!
It reduces server load: Caching acts as a middleware between the client and the server. It intercepts the request from the client and acts on the request data. If the response data is in the cache, the client can get the data without involving the server. Never doubt the power of middleware.
It improves your application’s performance: Because the server is freed from reprocessing the data that has been cached, it can perform other operations instead. That's efficiency!
It can reduce server costs: AWS Lambda, Cloud Functions for Firebase, and other serverless services base their charges on the number of requests made to your app. Caching reduces the need for those requests. (What will you do with all that cash? Get it?)
How Does Caching Work?
When a client makes an API request to a server for the first time, the server returns a response with one of these configurations in its header: ETag, Cache-Control, or Last-Modified. Based on these configurations, the client decides how to cache the response data.
For instance, if you set the value of Cache-Control in the API response header to max-age=60, the browser will cache the response data for sixty seconds. When the browser makes a request to the API within the sixty-second timeframe, the browser will use the cached data instead of sending a request to the server via the API.
ETag and Last-Modified headers configure the browser caching differently than Cache-Control. The client sends a request to the API with either the ETag or Last-Modified value, and the server compares the values with the required resource. If the values are different, the API returns a new response to be cached. If the values are the same, the server returns empty content, which triggers the client to read from the cache, saving on bandwidth.
Implement Caching for Your APIs
Ready to play? In this implementation guide for each header configuration, you’ll use Node.js in Express.js and a basic HTML page that communicates to the Express server.
Create a file named index.html and paste the following code:
<html lang="en"><head><meta charset="UTF-8"><meta http-equiv="X-UA-Compatible" content="IE=edge"><meta name="viewport" content="width=device-width, initial-scale=1.0"><title>Cache Tutorial</title></head><body><p>Hash ID <br> <span style="width:400px; word-break: break-all;"id='hashId'></span></p></body><script>fetch('http://localhost:4001/hash-id').then(response => response.json()).then(data => {console.log(data)document.querySelector('#hashId').innerHTML = data});</script></html>
The index.html will act as your mini-website. In the script tag, you are accessing an endpoint in your API server that returns a hash ID.
Creating the API Server Template
Create a package.json file and paste the following:
{"name": "caching_tutorial","version": "1.0.0","description": "","main": "index.js","dependencies": {"cors": "^2.8.5","express": "^4.17.1","nodemon": "^2.0.15"},"devDependencies": {},"scripts": {"test": "echo \"Error: no test specified\" && exit 1","start": "nodemon index"},"keywords": [],"author": "","license": "ISC"}
Open a terminal in the root directory of your package.json file and run npm install.
Create an index.js file and paste the following:
const express = require("express");const cors = require("cors");const app = express();app.use(cors());app.set("etag", false);const timeout = (ms) => {return new Promise((resolve) => setTimeout(resolve, ms));};const test = async (req, res) => {await timeout(3000);return res.json( "ggOGTM3DADYM6m1AdoWAtVVLOwaoUAdai1ia82M6LXk0EANMPHbI229JHH69DoC1hCJE0g66GYAYPtB5LYt6dDz8l9Ivkwe6tdLn7vD9Dew0LeEw3C9zncMzvBiwYnSjYscMgZ7y3s0pfVlEQdJUqGTyJT72PdqvbLXDRycCSu7fbJRng9yRgqeRnXdCXIhSqCeVHO6eGhCXu4eembjvTjW6DhlYzqz7npMQvZoYm7tP8l");};app.get("/hash-id", test);app.listen(4001, () => {console.log("App listening on port 4001!");});
Run npm start in a terminal. Your API server is ready to be consumed by the HTML page.
Express.js implements caching out of the box by adding ETag to your response header, but in order to show how Cache-Control and Last-Modified work, it’s disabled above.
There is a three-second break in the hash-id API route that acts like a long task the API needs to perform before returning a response. This is to compare the speed of the API request when it’s cached versus not cached.
Testing the API without Caching
Open the
index.htmlin your browser, right-click on your browser, and click Inspect. The Chrome developer tool will open.Select the network tab and untick
Disable cacheas seen in the screenshot below: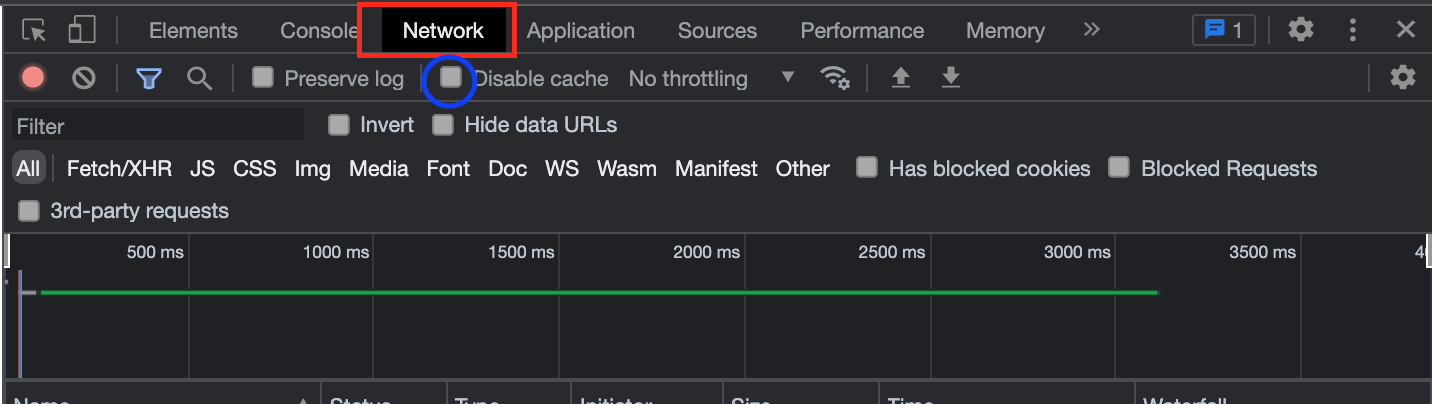
Disable caching in Chrome DevTools Reload the browser and monitor the network tab. You’ll notice it takes about three seconds for the API to respond and the size of the data transferred is 466 bytes, as seen below:

466 bytes returned from the network request
Next you’ll implement the different response headers.
Implementing the Cache-Control Header
Cache-Control specifies whether the client should cache the response and for how long it should be cached.
In your index.js file, paste the following code:
const express = require("express");const cors = require("cors");const app = express();app.use(cors());app.set("etag", false);const timeout = (ms) => {return new Promise((resolve) => setTimeout(resolve, ms));};const test = async (req, res) => {await timeout(3000);res.set("Cache-Control", "max-age=15");return res.json("ggOGTM3DADYM6m1AdoWAtVVLOwaoUAdai1ia82M6LXk0EANMPHbI229JHH69DoC1hCJE0g66GYAYPtB5LYt6dDz8l9Ivkwe6tdLn7vD9Dew0LeEw3C9zncMzvBiwYnSjYscMgZ7y3s0pfVlEQdJUqGTyJT72PdqvbLXDRycCSu7fbJRng9yRgqeRnXdCXIhSqCeVHO6eGhCXu4eembjvTjW6DhlYzqz7npMQvZoYm7tP8l");};app.get("/hash-id", test);app.listen(4001, () => {console.log("App listening on port 4001!");});
Before returning a response, you’re adding res.set("Cache-Control", "max-age=15");. This allows the client to cache the response data on its local storage for fifteen seconds before the data becomes stale and hits the server for fresh data.
Reload your browser twice, and you’ll notice a dramatic change in the response time.
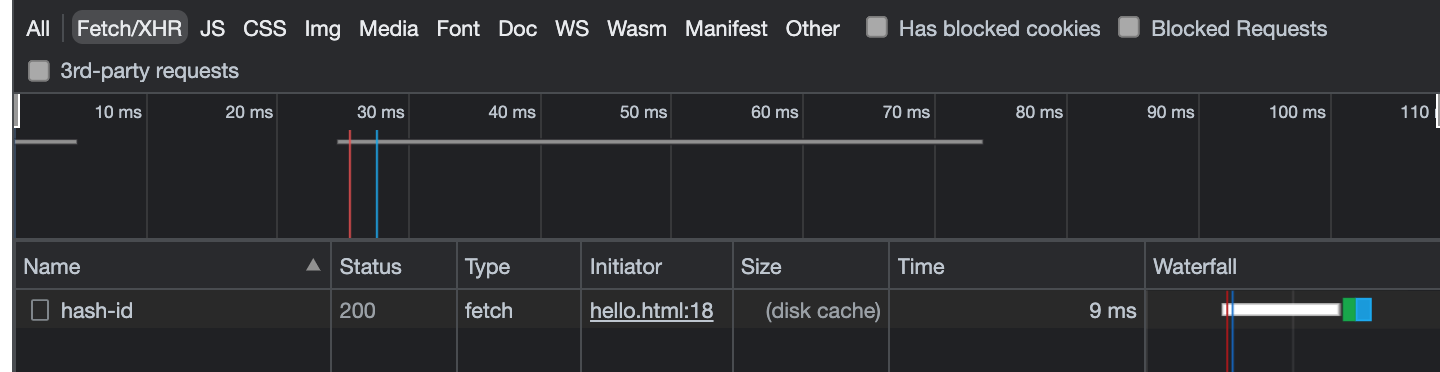
Before caching, the response time was three seconds. Caching reduced that to nine milliseconds, and no data was transferred because it was read from the disk. That kind of time difference is what turns competitors into champions in the Olympics, and it’s what will keep users interacting with your app.
Implementing the Last-Modified Header
The client and the server use Last-Modified to verify if the resource has changed on the server before replacing the cache. However, Last-Modified uses a time strategy instead of a token, unlike ETag. The cache checks if the value in Last-Modified has changed. If no, the client uses the cached data without downloading the response from the API. If the Last-Modified header differs from what is in the client’s cache, the client caches the new response data.
const express = require("express");const cors = require("cors");const app = express();app.use(cors());app.set("etag", false);const timeout = (ms) => {return new Promise((resolve) => setTimeout(resolve, ms));};const test = async (req, res) => {await timeout(3000);res.set("Last-Modified", "15 Nov 2021 17:55 GMT");return res.json("ggOGTM3DADYM6m1AdoWAtVVLOwaoUAdai1ia82M6LXk0EANMPHbI229JHH69DoC1hCJE0g66GYAYPtB5LYt6dDz8l9Ivkwe6tdLn7vD9Dew0LeEw3C9zncMzvBiwYnSjYscMgZ7y3s0pfVlEQdJUqGTyJT72PdqvbLXDRycCSu7fbJRng9yRgqeRnXdCXIhSqCeVHO6eGhCXu4eembjvTjW6DhlYzqz7npMQvZoYm7tP8l");};app.get("/hash-id", test);app.listen(4001, () => {console.log("App listening on port 4001!");});
Implementing ETag Header
ETag is a token attached in the response header. Whenever the client performs subsequent requests, the client attaches ETag and the server validates it. If the ETag in the client request header is equal to the ETag generated in the server, the API returns an empty content and the client reads from the cache.
Initially, when you wanted to test the API without caching, you disabled the ETag by setting etag to false (app.set('etag', false). Express provides a simple out-of-the-box caching for APIs. The example code below shows how to provide your own unique ETags without relying on the one generated by Express.js.
const express = require("express");const cors = require("cors");const app = express();app.use(cors());const timeout = (ms) => {return new Promise((resolve) => setTimeout(resolve, ms));};const test = async (req, res) => {const ETag = "randomId-1";if (req.headers["if-none-match"] === ETag) {return res.status(304).json("");}await timeout(3000);res.set("ETag", ETag);return res.json("ggOGTM3DADYM6m1AdoWAtVVLOwaoUAdai1ia82M6LXk0EANMPHbI229JHH69DoC1hCJE0g66GYAYPtB5LYt6dDz8l9Ivkwe6tdLn7vD9Dew0LeEw3C9zncMzvBiwYnSjYscMgZ7y3s0pfVlEQdJUqGTyJT72PdqvbLXDRycCSu7fbJRng9yRgqeRnXdCXIhSqCeVHO6eGhCXu4eembjvTjW6DhlYzqz7npMQvZoYm7tP8l");};app.get("/hash-id", test);app.listen(4001, () => {console.log("App listening on port 4001!");});
When Cached Data Changes
ETags and Last-Modified headers revalidate the data in the cache once the previous ETags and Last-Modified headers don’t match the value of the new ones. If the data in the cache is the same with new data regardless of the change in values in either header, the client won’t update the cached data. If the data is different, the client updates the cache.
For Cache-Control in combination with max-age, it’s important to use a short max-age value even if the API response data won’t change often. Once the API data is cached for a long period, you can’t control whether to invalidate the cache, so you’ll need to provide a mechanism to force your users to clear their cache or provide an alternative API for the new data.
The power of GraphQL: purging
There are many CDNs out there that can cache REST APIs. However, they are stuck with TTL-based caching, where cached data expires based on the max-age. While GraphQL uses POST requests and thus cannot be cached by simply setting a Cache-Control header, it's introspectability means that one can implement purging — which means you can cache a lot more data for a much longer time.
If you're curious to learn more, check out our article on Caching REST APIs vs. GraphQL APIs!